STEP-BY-STEP GUIDE
- Step I: Design the build, name the doors, set the"[Black Tulip] Configure Doors v2 ~CFG~" notecard
- Step II: Edit the build to set the doors in closed state
- Step III: Edit the build to set the doors in open state
- Step IV: Test your doors and confirm
- Step V: Set the "[Black Tulip] Door Controller v2 ~CFG~" notecard
- Step VI: Drop the "[Black Tulip] Door Controller v2" script
The best way to understand how to work with the Black Tulip Multi-Door/Drawer/Curtain Tool is to go through an actual setup process, in a step-by-step fashion. To that end, we've provided a simple example build called "[Black Tulip] Test Door Model". To follow this Guide, you need to be in a location in SL where you have permission to Build (i.e. rez prims), and where scripts are enabled.
Rez the "[Black Tulip] Test Door Model" sample object included in your package. You will see two very simple miniature doors on a small platform: a single door and a set of double doors.
By following this Guide, you will see how to independently control the single door and the double doors. Proceeding in a similar fashion, you should be able to set up doors that consist of three, seven or sixteen prims. As many as you need (but please check the "Limits" section.)
STEP I
DESIGN THE BUILD, NAME THE DOORS,
SET THE "[Black Tulip] Configure Doors v2 ~CFG~" NOTECARD
When you work with your object, you have to make sure of the following:
- The doors/drawers/etc. are LINKED to the build
- Doors/drawers/etc. are NOT supposed to be the ROOT prim
The last requirement is very important: NONE of the prims that should work as doors/drawers/etc. can be the root prim.
Inspect the "[Black Tulip] Test Door Model" sample object, to check these first important details:
- None of the doors is the root prim
- All the build is linked. There are NO separate prims.
Continuing with inspecting the object, make sure now that you're under the "General" tab.
Prims that will be considered as doors must have a distinctive NAME. Doors that are supposed to open and close together will have the same NAME. Let's insist on this: NAME. Not description. NAME. It is easy to confuse both fields. "Name" is above "Description". We will be using the upper field: "Name".
With your "Edit" window up, on the "General" tab, tick the "Edit linked parts" option if it isn't already ticked.
Now click the single door of the "[Black Tulip] Test Door Model" sample object. You will see that its name is "Kitchen Door".
Now click the prims that compose the double door. Both are named "Main Door". This is because we want the two prims moving together.
Close the "Edit" window.
Our doors may be composed of one or more prims. When several prims are part of the door, we'll name all of them the same, so that the script can recognize them as a group to move them in a single block when opened/closed.
Now, MAKE A COPY of your build PRIOR to starting with the configuration process. Don't skip this. If you make a mistake while configuring the doors and feel lost, it's going to be easier starting again from this copy than trying to figure out how to solve it. You can of course try to figure out how to solve it after you've read the complete documentation, but in any case, make this copy. Now :-)
With this first information, we now compose a notecard that should be named "[Black Tulip] Configure Doors v2 ~CFG~"
Open the "[Black Tulip] Configure Doors v2 ~CFG~" notecard included in your package. (Double-click it in inventory and it will open.)
This notecard should contain the following text:
# [Black Tulip] Configure Doors v2 ~CFG~
# Add a line per door name

DoorName = Main Door
DoorName = Kitchen Door

# Add a line per allowed avatar - Do NOT use display names.
LEGACY NAMES only - http://wiki.secondlife.com/wiki/Category:LSL_Legacy_Name
This notecard tells the "[Black Tulip] Configure Doors v2" script which groups of prims define our doors.
In this case, we have two:
    Main Door
    Kitchen Door
Be careful writing these names, as the script will look for them in a case sensitive way. This means that "Main Door", "Main door" and "main door" are *different* names.
IMPORTANT: Do not use leading or trailing spaces for your name. The script will omit any leading/trailing spaces in the name, which will cause it to ignore any relevant prim using them.
IMPORTANT: Do not use names that are too long. The configuration tool needs to rename the prims once you're done. If your names hit the maximum length allowed, the controller will not work correctly. Keep names under 60 characters.
Once we have our "[Black Tulip] Configure Doors v2 ~CFG~" notecard ready, we have to:
- Edit our build (the "[Black Tulip] Test Door Model" object you rezzed previously)
DO NOT TICK "Edit Linked Parts" - Drop the "[Black Tulip] Configure Doors v2 ~CFG~" notecard in the "Content" tab of the object.
- Drop the "[Black Tulip] Configure Doors v2" script in the "Content" tab.
The script will notify you when the configuration notecard is read with a message that reads for example as:
[11:07] [Black Tulip] Test Door Model: [Configure Doors v2]
Reading configuration notecard: Done
Free memory for the script: 19050 bytes
Once you read this message, it's time for the configuration tool script to work.
STEP II: EDIT THE BUILD TO SET THE DOORS IN CLOSED STATE
First, we have to tell the script that our doors are ready in closed state.
Edit the sample object and tick "Edit Linked Parts". Then rotate/move the doors so they are approximately as the following picture shows:

Once done, close the "Edit" window. Now:
- Click the build. You will see a menu appear with eleven options.
- Click "Save Closed". The script will notify you in local/nearby chat that it has saved the closed state.
NOTE: In your own objects, often the closed position will be the default state you've left your build in. The purpose of the sample object is to make you aware that the closed position needs to be set.
STEP III: EDIT THE BUILD TO SET THE DOORS IN OPEN STATE
Next we will tell the script when our doors are ready in open state.
To do this, edit the build, tick "Edit Linked Parts", and rotate/move the doors so they're approximate to what the following picture shows:

With "Edit Linked Parts" ticked, you would first click the single-prim door, then rotate/position it, to set its open state. Then you would click one of the prims of the two-prim door, set the open state for it, click the other prim for the two-prim door, and also set its open state.
Close the "Edit" window. Now:
- Click the build to bring up the setup menu again.
- Click "Save Open". The script will notify you that it has saved the open state.
NOTE: It's not required that we set first the "Closed" state, then the "Open". We may do it in the order we prefer. We may also correct the states whenever we want, simply clicking in the menu if the state we're saving is "Save Closed" or "Save Open".
NOTE: You don't need to close the menu and then open again every time you need it. You may move all the prims as you need while the menu is open. The timeout is set to 10 minutes. This means that once you open the menu, you may have it up for 10 minutes before it expires. During that time with the menu up, you can manipulate the prims normally, then directly select the option you need.
STEP IV: TEST YOUR DOORS AND CONFIRM!
We have three options in the menu to test our doors. These are:
Close All: This will set all the doors to the closed state.
Open All: This will set all the doors to the open state.
Play: This will close and open, close and open, close and open... all our saved doors, every three seconds, until we click again to stop this loop repetition. The purpose is so that we can zoom and focus in each group of doors in a large and complex build, and see them opening and closing, so we're sure that they are all in the positions we want.
NOTE: If there are unsaved states, the script will remind us and won't set the doors... because it has no data saved to set them.
When everything is set as you desire, click to show the menu again, and select "CONFIRM!"
This outputs a lot of text to your chat window (owner say messages), and to prevent mistakes, deletes itself from the build, as well as the "[Black Tulip] Configure Doors v2 ~CFG~" notecard. Once the "CONFIRM!" action is complete, neither the "[Black Tulip] Configure Doors v2 ~CFG~" notecard nor the "[Black Tulip] Configure Doors v2" script exist any more in your build.
And what should we do with all the text obtained in chat? We use it to compose the "[Black Tulip] Door Controller v2 ~CFG~" notecard.
IMPORTANT: After we confirm, the door prims are RENAMED in a certain way. You will not be able to use your build as-is with your existing "[Black Tulip] Configure Doors v2 ~CFG~" notecard... but you will be able to RESTORE the information saved in the "[Black Tulip] Door Controller v2 ~CFG~" final notecard. However, since we all make mistakes, remember to MAKE A COPY of your build PRIOR to starting with the configuration process.
The configuration tool has some more convenient options that will help you while you prepare your doors, or if you need to restore the information from an already made build, in order to modify the setup. Check the "THE CONFIGURATION TOOL, IN DETAIL" section for all the details.
STEP V: SET THE "[Black Tulip] Door Controller v2 ~CFG~" NOTECARD
We will explain later in the «THE "[Black Tulip] Door Controller v2 ~CFG~" NOTECARD FORMAT, IN DETAIL» section all the details about the "[Black Tulip] Door Controller v2 ~CFG~" notecard. Let's focus now on what we should do with the output obtained in chat after selecting "CONFIRM!"
NOTE: A line beginning with # is taken as a comment line. Thus, everything written after it will be *ignored*.
First, open the "[Black Tulip] Door Controller v2 ~CFG~" notecard.
You should see the following text:
Right now, let's focus only on these comment lines:
# Saved settings for the saved closed/open states
# --------------------------------------------------------------------------
Below them is where you have to copy the output in chat.
Where and what exactly?
After you clicked "CONFIRM!" in the configuration tool, you have obtained in your local/nearby chat window a lot of text that looks like the following:

The text between this part of the output:
[10:39] [Black Tulip] Test Doors Model: [Configure Doors v2] Save the data below in a notecard named:
[Black Tulip] Door Controller v2 ~CFG~

Refer to the sample notecard for more information.
[10:39] [Black Tulip] Test Doors Model: ---------------------------------------------------------------------
and this part of the output:
[10:39] [Black Tulip] Test Doors Model: ---------------------------------------------------------------------
[10:39] [Black Tulip] Test Doors Model: [Configure Doors v2] All done. Removing configuration script and notecard.
should be copied and pasted into the "[Black Tulip] Door Controller v2 ~CFG~" notecard, below the section:
# Saved settings for the saved closed/open states
# --------------------------------------------------------------------------
so the resulting notecard should look like:
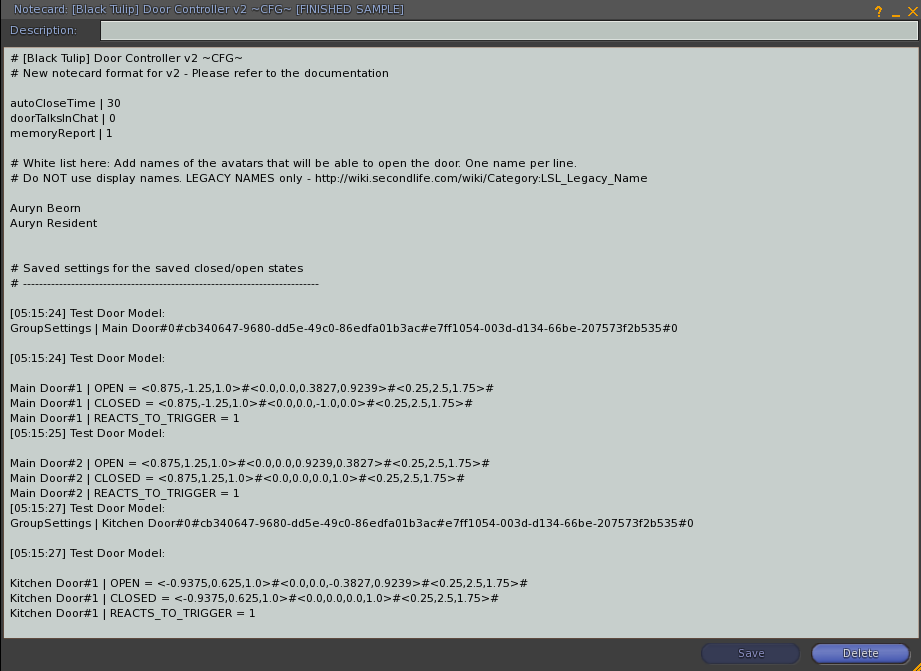
You can check how this is done in an actual notecard by opening the "[Black Tulip] Door Controller v2 ~CFG~ [FINISHED SAMPLE]" included notecard in your package. Notice though, that should you want to use that finished notecard with your build, you should RENAME it to "[Black Tulip] Door Controller v2 ~CFG~" in the first place :-)
NOTE: Don't worry about cleaning out the timestamps in the notecard.
NOTE: If you want to clean the output and remove the timestamps, you can of course do so. That will make the script to read your notecard faster. Check the included "[Black Tulip] Door Controller v2 ~CFG~ [FINISHED CLEAN SAMPLE]" notecard for an example of how a "cleaned" notecard would look:

After having composed your "[Black Tulip] Door Controller v2 ~CFG~" notecard, save it, and drop it into the "Content" tab of the build. We're just one step from finishing.
STEP VI: DROP THE "[Black Tulip] Door Controller v2" SCRIPT
Yes, that's it. Drop the "[Black Tulip] Door Controller v2" script in the same prim that contains the "[Black Tulip] Door Controller v2 ~CFG~" notecard (the root prim), and if everything in the notecard is correct, your doors are ready to be used.
And best of all? You're controlling *all* of your doors with a single script. The script, internally, optimizes the use of the timer so it's only working while there are doors open, but automatically closed as soon as all the doors are closed. And doors are usually closed. So don't worry about issues with lag.